Sugar, Saccharification, & Homemade Reindeer Lichen-Malt Syrup

alcohol, fermentation, sugar

Question: how is potato vodka made? Like, how is a potato turned into alcohol? You need sugar right? Shred a potato into water, ferment it and what happens? Yuck. So where does all the sugar come from?

Alcohol made from grains uses malt to produce sugar. Malt is a grain that is sprouted for just a few days, then is dried and possibly roasted. A grain kernel contains mostly starches, which is that prized stuff we eat every day in various forms of flours. When the seed begins to make new life, those starches are converted into sugars (denaturing its bread-worthy-ness) through enzymes to assist in the growing of that new plant. What an amazing human moment this must have been to nibble on a just sprouted seed and taste a sweet kernel! (Here is a malt-making tutorial).

Similarly another likely result of curious human nibbling was in the case of moldy rice in Asia. The white fuzz later became referred to as koji and also converted the plentiful starches on grains into fermentable sugars.

While it’s probable you’d get some additional sugars from molding a potato in koji, I wouldn’t necessarily go about sprouting it. There has got to be a better way.

In both cases with the malted grains and with the koji-cultured grains a similar thing is occurring- the process of saccharification. By way of enzymatic activity present starches are being converted into sugars. But not only can they do it for their hosts but they actually hold the capacity of converting additional starches as well. This is known as its diastatic power. Any additional starches that get added, the brewing universe refers to as adjuncts. Therefore malt and koji can be used as the sugar-making “starter” which we add something else- possibly cheap, plentiful, and packed with starches- like the potato!

Or… lichen!

Why lichen? Reindeer lichen specifically, aside from being good landscaping for your model train set, has been found to be also packed with starches- packed as in 94% carbohydrates compared to the potato at 14%. A little inverted compared to the mushroom world, most lichens are edible, with the minority being problematic. The only drawback is that, in the case of reindeer moss, it also contains acids accumulated over time which can erode stone and when in your stomach, while it won’t kill you, doesn’t feel great. Therefore in order to make sugar from it we first we need to leach out the acid, which is easily done with the help of an alkaline water bath using lye, cal, or baking soda.

It’s done like this:

  1. Cover the lichen with water in a pot and add 1 teaspoon of lye, bring to a boil, turn off heat, and let soak for 24 hours.
  2. Drain and rinse.
  3. Take a small piece and dry it. Taste a nibble for any bitterness. If there is any, repeat steps until its gone. It should take 2-3 changes of water to do. When the coast is clear, proceed to drying the whole thing.

Supposedly history tells us that lichen’s hayday came during World War 2 when the supplies for sugar beets and potatoes were low, yet demand for alcohol was unwavering and spirits were made from lichen. However it never really took off as the processing of it was never cost effective. Prepared lichen could be crushed and used in bread, added to thicken soups and sauces, or we can go on to convert it into sugar, thusly:

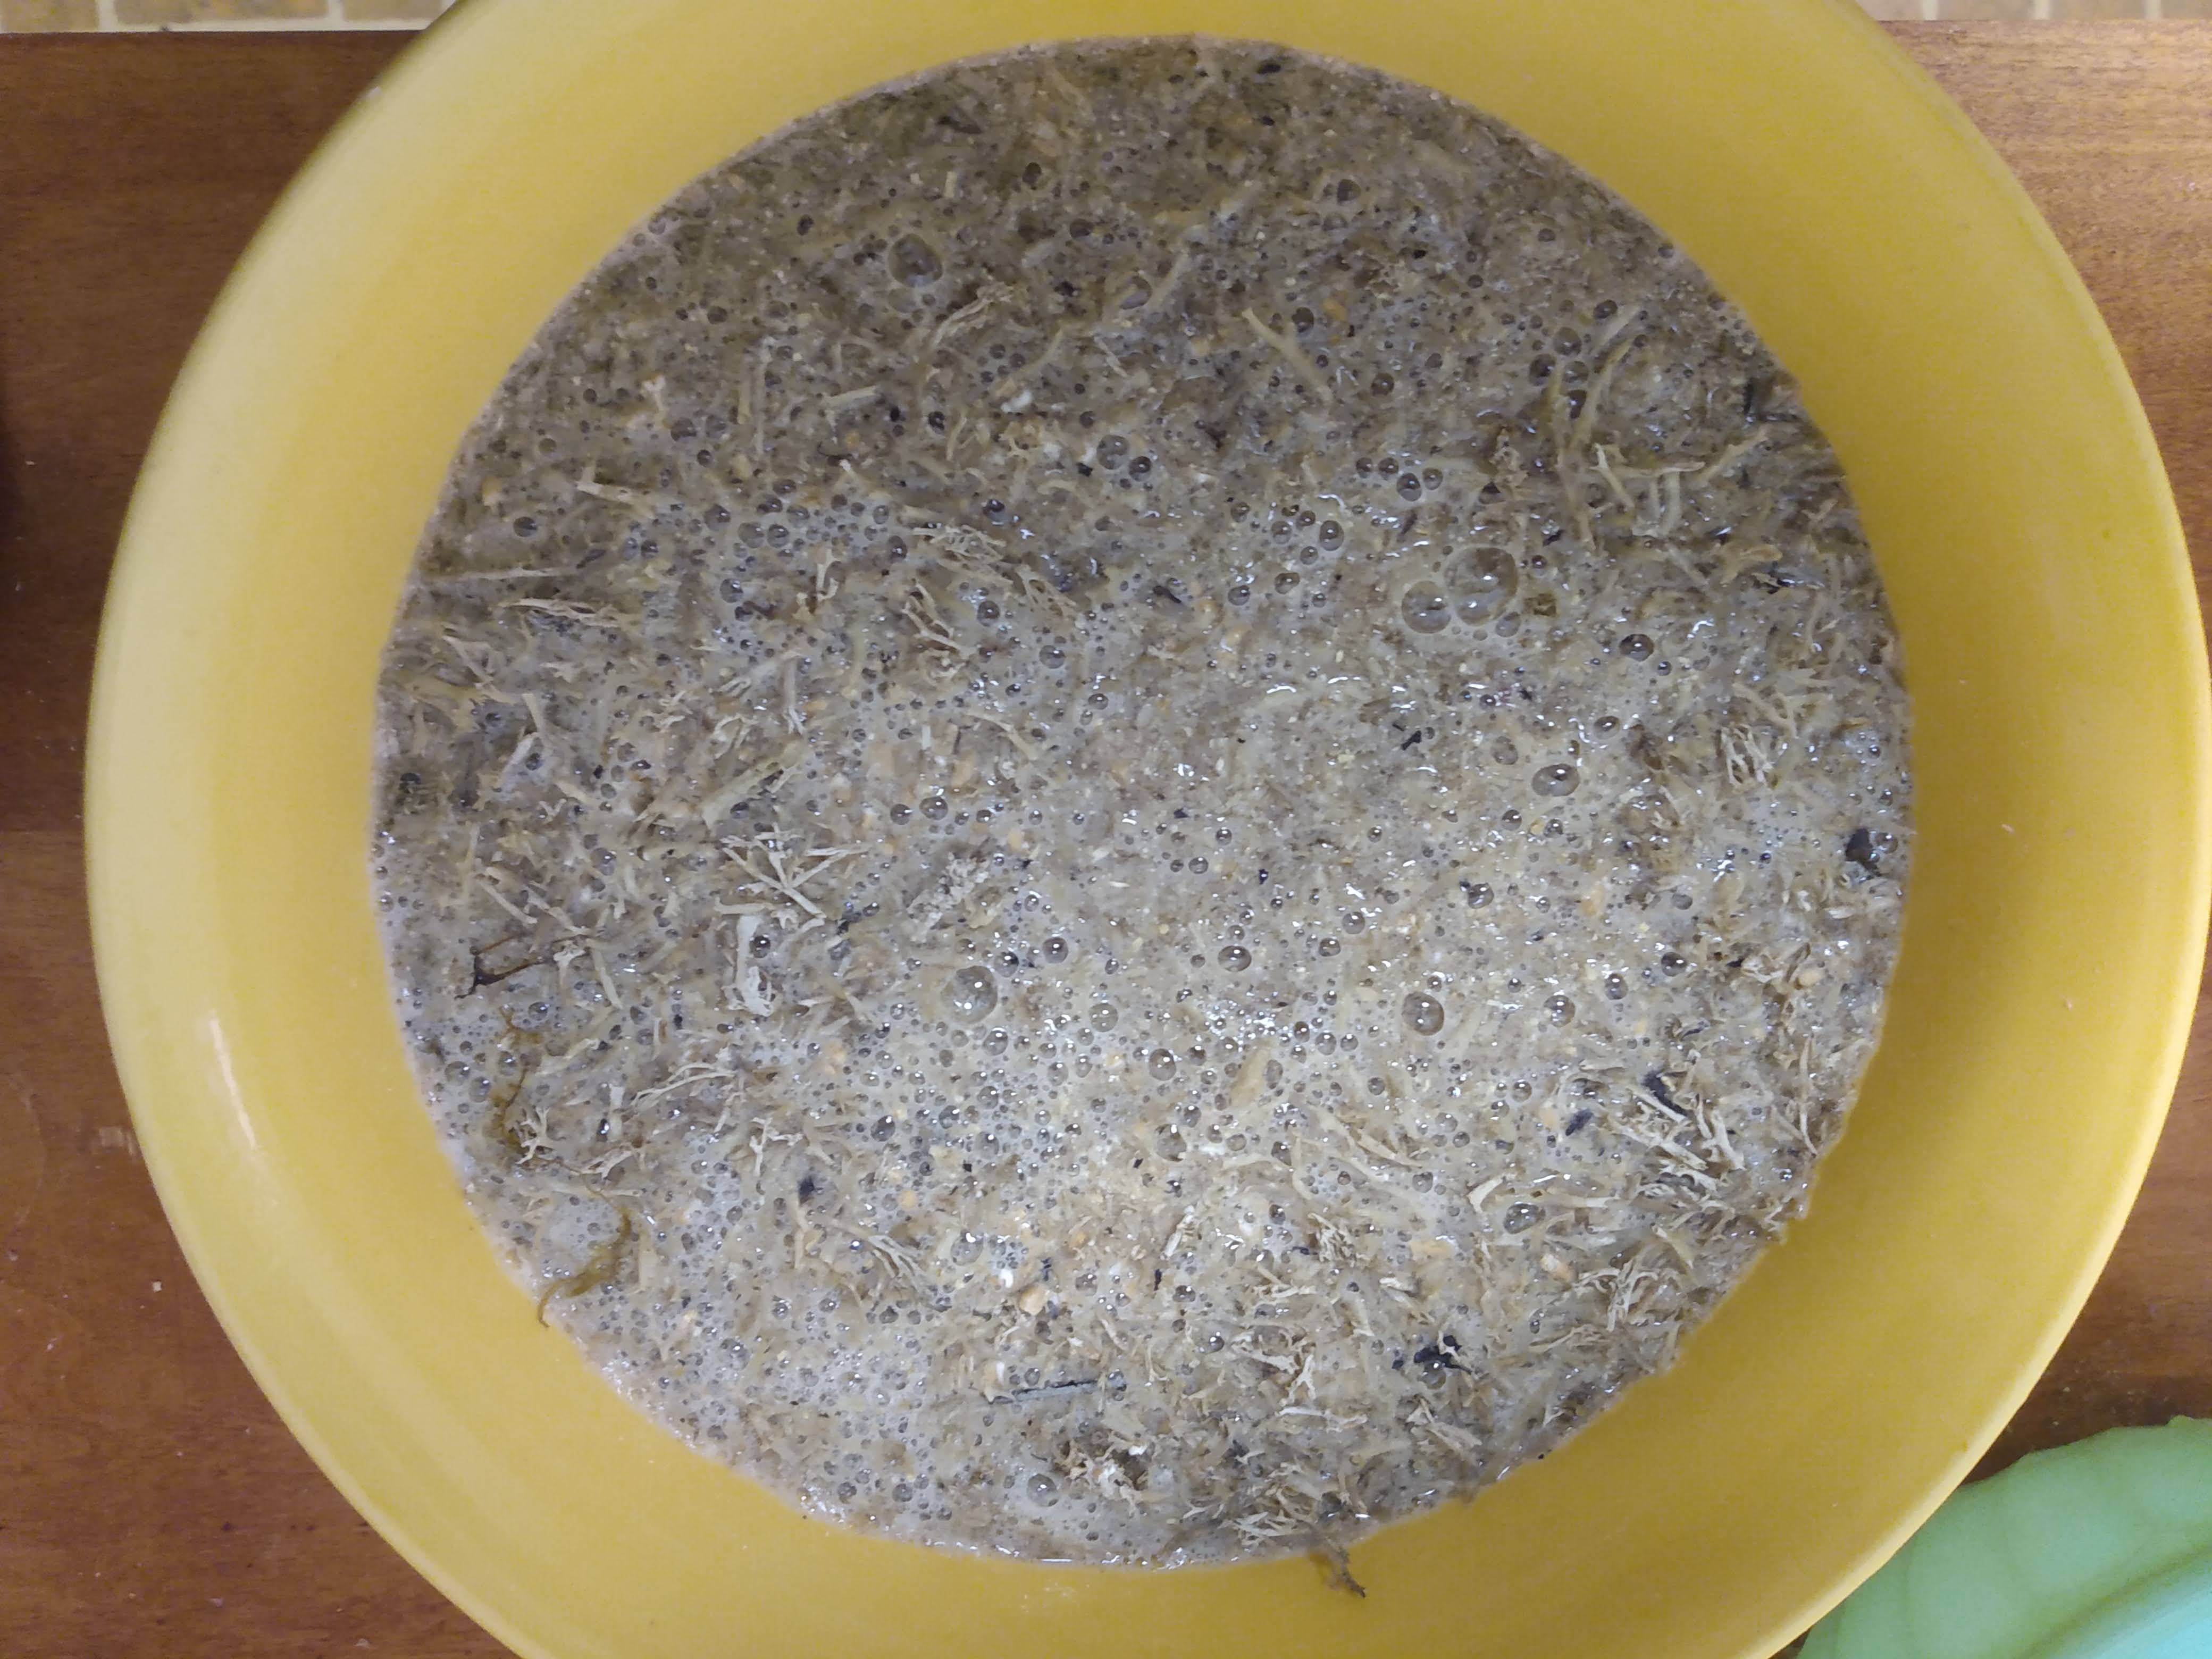
  1. Combine crushed malt and crushed and dried lichen in a 1:1 ratio. (Note: this ratio was randomly picked to ensure the desired results)
  2. Heat water separately to 155 degrees, add to the grain and lichen mixture to cover liberally and hold at 150 degrees for 1-2 hours. Why you ask? Because the enzymes need to be broken down in order to be accessed and 150 degrees gelatinizes many things including grains. Note also that at 165 degrees all enzymes are destroyed. How shall I heat it may you ask? Perhaps a pot in the oven if your oven goes low enough, a pot in a dehydrator that goes high enough, maybe this handy incubator design, or a thick pot with a keen eye on stove and frequent stirring.
  3. (Optional). You can let the mixture cool overnight to allow more time for the enzymes to further breakdown the starches.
  4. Strain and squeeze excess liquid from the solids.

You can now either boil your sweet liquid into a molasses-like malt syrup or go ahead and brew it, distill it, or what have you.

Reindeer lichen, often referred to as Reindeer Moss, is fairly abundant in our region, especially in our nearby forests. One thing you should know is that reindeer lichen is extremely slow growing, about 3mm per a year. While expansive patches exist in Western Pennsylvania, it’s always worth considering such details to decide whether its worth it to harvest. My little harvest was to explore the rumor I’ve heard about lichen as a sugar and I hope you found it worth it.

How to Malt Homegrown Grain

alcohol, bread, Homegrown Grains, sugar

Malt is a grain that has been sprouted for a short period and halted in order to optimize its enzymic potential to convert starches into fermentable sugars. It can be a useful ingredient to have around for making sweet malt syrup, for baking, and for fermenting into alcohol.

This works on any grain, whether it be corn, millet, einkorn, wheat or other. Each grain differs in respect to its diastatic power, which is a measure of its potential enzymic activity.

Process

Soak grains in enough water to cover for about 10 hours.

Strain and put in a warmish place. We’re shooting for around 70-75 degrees. Rinse by covering with water and straining every 8 or so hours, stopping once some germination begins to show.


For optimal diastatic power we’re letting the sprouts develop until the acrospire is about the same length as the seed kernel. The acrospire is the little shoot that is the new plant as opposed to the rootlets. It grows in the opposite direction of the rootlets. If the kernel is allowed to continue growing it will eventually use the nutrients itself to assist its own growing and our diastatic power will be compromised.

Some “mixing” or turning with your hands may be helpful as the rootlets leg out in order to encourage uniform growth. In big malting operations they will rake them.

When the kernels are ready to halt their growing process dry them for 8-10 hours at 120 degrees. This produces a “green” malt. At this point the rootlets should flake off easily. It’s thought by some that they contribute bitter notes and are separated and removed before proceeding.
If additional flavor is desired move the malts to an oven at 170- 180 degrees and roast until the color and aroma suits you. Raising temperatures above 165 degrees destroys the enzymes however, not allowing the malts to contribute to any adjunct starches. This non-diastatic malt can be used to contribute sweetness, flavor, and possibly color to your bread, beer, or whatever recipes.

Diastatic malt (not dried or roasted above 165 degrees) can be combined with additional starches to make sugar through a mashing process that involves holding the crushed grain and adjunct at 150 degrees for 1-2 hours. Learn more about this and how to make a malt syrup here.

If milling and using for bread baking it is recommended to use nondiastatic malt, or use diastatic malt in small quantities (0.5 – 2% total flour weight) and only for breads with short fermentation times. Diastatic malt is a great energy source for yeasts however it can break down too many starches resulting in a gummy crumb.

*Most of these posts are resources for Ferment Pittsburgh’s monthly newsletter that features seasonal ideas, techniques, and musings. Consider jumping aboard?

Processing…
Success! You're on the list.

Making Maple Mead from Sap

alcohol, fermentation

To make this mead you’ll need a plentiful amount of sap to work with. Maple mead is a great idea for a home tapper who gets overwhelmed with sap. This recipe is for those ambitious types who do their makings from scratch- go out there and tap those trees!

The sap itself can be quick to spoil. It is high in pectin which will, in time, make the sap into a weird jelly-ish texture, this then could invite mold or other unwanted microbial influence such as the fermenting away of the little amount of sugar presently available. The sap is only ever-so slightly sweet, 40:1 sugar ratio. Therefore it doesn’t have enough sugar to ferment into much alcohol just as is. However, by boiling it down we can concentrate the sugars into a beverage to produce a suitable amount of alcohol.

When making alcoholic beverages I prefer to get my measurements generally accurate, erring away from specifics but shooting for close enough- and for that I use a hydrometer. While not an advocate for buying too many things, I do think this instrument is worthwhile, and is only about $20 anyway.

Hydrometers measure sugar in terms of brix. And roughly converted about 1 degree brix can ferment into about 0.5% alcohol. Therefore for an average 5-6% beverage we’d need somewhere around 10-12 brix, for 10% we’d need about 20 brix, etc. For those who wish to eye-ball it rather than measure I’d recommend boiling down to about 1/10. The sap should taste sweet as juice. The sweeter, the higher alcohol you’ll likely get. However, there is too sweet that it won’t ferment. In that case you’ve made maple syrup- congrats.

Monitor your boiling, whether it’s indoors or outside. More information on boiling is given in the maple syrup post here. Regardless of your method do keep an eye on it to reach your desired brix level or finger-licking sweetness level. A burnt sap is a heartbreaker. Keep in mind too that the temperature of the liquid affects the hydrometer reading, so if you’re use a hydrometer with some hot sap here’s a handy calculator to use.

Once the liquid has reached your target, let it cool.

We have boiled to death any microbes previously in the sap and consequently have a pasteurized base, we now need to think about how to start it fermenting. This can be done by adding yeast, backslopping from an active brew, or reinstating wild yeast by leaving it open to the air. Inviting wild yeast can be assisted through vigorous and frequent stirring, however this can increase your chances of acetobacter (giving your final brew a hot acidic bite), but maybe it’ll work out?

Ferment to dry either continuing to use your hydrometer to get a reading below 0, or to wait until absolutely all bubbling activity has ceased. Rack then age in a clean carboy with an airlock for 3-6 months, or bottle away.

Homemade Vinegar

alcohol, homesteading, Vegetable Fermentation

Making vinegar from scratch can be such a sinch, and coupled with its indispensability in the kitchen, makes it a worthwhile endeavor. The process of getting to vinegar is simple:

  1. start with a sugary liquid
  2. let the sugars ferment into alcohol by way of our friendly local wild yeast
  3. then with continued air exposure the alcohol will be eaten up by native acetobacter making it into vinegar. Boom!

An even simpler overview:

  1. crush fruit in your fermentation vessel of choice
  2. leave it be until it tastes like vinegar.
  3. strain the solids. So easy!

What can be made into vinegar?

Damaged fruit and vegetables, including scraps like cores, skins and other odds and ends are excellent candidates for turning into vinegar. High sugar content is helpful, though there’s way to make it out of just about anything.

Step 1: Preparing the mash

Choose what you would like to make vinegar out of and then make a puree out of it. If your ingredients can’t provide enough liquid themselves, it’s okay to add water until it becomes a loose slurry. However keep in mind that our goal is to have as much sugar as we can, as it’ll impact the strength of the final vinegar. If you add water you may want to consider adding some sugar as well. More on that below:

Controlling the final acidity of your homemade vinegar

Being able to control the final acidity of our vinegar will help us ensure a smoother transition with less fungal threats and provide us with a consistent product to rely on for our culinary projects. Generally the vinegar we buy from the grocery stores are 5% acidity.

The percentage of acidity is roughly the same as percent alcohol. That means a 5% alcohol can make about a 5% acidity vinegar. Since the sugars present in our original mixture will ferment into alcohol, the amount of sugar then is directly responsible our final strength of acidity. 

sugar –> alcohol –> vinegar

I use a hydrometer I bought for $20 that measures sugar in liquid through Brix. 1° Brix is about 0.5% alcohol. Additionally my napkin math says that 12g of sugar per a quart of liquid equals 1 brix, so 24 grams equals 1% alcohol, aka 1% vinegar. That estimate can be handy to bulk up the potency of your vinegar, balance a watered-down mixture, or if you want to make vinegar from something that doesn’t really have any sugar to offer, such as celery.

Step 2: Fermenting

Once you have your sugar content in order, now comes the fine art of wild fermentation. In order to employ the native wild yeast you really don’t have to do anything. The common line of thought is to place a cloth over the top of your fermentation vessel, fixed on with a rubber band or string so there is a constant contact with air. However when using ripe fruit or old vegetables I just place a loose fitting lid over the container. The wild yeast are likely well colonized already on your ingredients that all you really need to worry about is the off-gasing from the fermentation not blowing off the lid. When I used to employ the cloth-cover technique my vinegar mixtures often would dry out before they completed.

Either way, there should be some bubbling activity of the wild yeast converting the sugars into alcohol within a few days. To expedite this process simply stir the mash occasionally to incorporate air. Also, keep in mind that the temperature during the fermentation will affect its speed. The warmer the faster.

Once the bubbling subsides, the yeast will have consumed as much sugar as they can and you’ve achieved maximum alcohol. At this point you can strain out the solids. Exposure to air is more important now than it was before. Acetobacter cruise the air looking for alcohol to devour up, and we hope they do. Basically our goal now is to make our alcoholic beverage “go bad.”

Finishing the vinegar

So let’s say you’ve pureed or mashed your fruit, altered the sugar content to your preference, and let it ferment to its heart’s content. Now the bubbling has subsided, which means the wild yeast have consumed all the fermentable sugars available to them and you’re at max levels of alcohol content. When does the vinegar happen?

That part, if doing naturally through wild methods is up to nature. It can sour immediately or may take weeks, or even months to do. And the only way to know is to periodically taste it. Now, there is a trick if you want to push it along. Acetobacter loves to hang out, so if you introduce it, it will find your alcohol party. You can be casual and leave an open container of vinegar next to your soon-to-be vinegar, or you can pour a splash in like a starter culture. Either way, shoot for a raw vinegar to do it with.

One final important note for once you finally have achieved your vinegar and it’s delicious and sour to you. Put a lid on it. Our natural, raw vinegar will actually disperse its acidic acid into the air overtime and eventually become a dull, faintly flavored water. Just toss it in a mason jar with a lid or similar and it’ll last a long long time.

What if weird things begin to grow on it?

The cool thing about vinegar, especially if we make sure to make one with sufficient final acidity is that once it becomes vinegar it’s no longer a hospitable environment for insects and mold. Consider how vinegar is used as a natural cleaner. I have heard of many cases, and then done my own vinegars, that were left in an open container with no cover and allowed to progress as nature willed it. After enough time I pulled off the gnarly top and had wonderful vinegar underneath. Not that I’m recommending this to anyone, but what a fun story to tell.

Most likely if your fermenting mash develops a growth it will be a white film called kahm. Do not despair, kahm is harmless, and is typically a product of lower sugar levels. You can always add more sugar, but when the vinegar finally develops it’s likely the kahm will die and settle into the lees.

Vinegar Processes

Tomato Vinegar

When in season tomatoes are a great candidate for vinegar. I slice and crush my overripe and split heirloom tomatoes. The last time I did this I got a reading of 6 Brix and the tomatoes provided plenty of their own liquid. If I ferment until all bubbling activity has ceased (0 Brix) I’ll get a 3% alcohol tomato “wine.” So letting that continue it’ll be a 3% vinegar. That’s not too bad, and I can assume even if you don’t measure, if you’re using ripe tomatoes you’ll get something similar. If I wanted to shoot for 5% acidity I could just add 48 grams of sugar to my quart of mashed tomatoes to get that additional 2% more.

Celery Vinegar

Puree enough celery for a quart of mash. This will vary but may take roughly one full head, then top it off with water just enough to cover. Stir in 120 grams of sugar until it is dissolved. Then on with the fermentation.

Processing…
Success! You're on the list.

Freeze Distilling for Apple Jack

alcohol, homesteading, Uncategorized

During those rough stretches of winter when the temperature gets to 0 and below and everyone doubles down inside their homes, we have a rare opportunity where I live in Pennsylvania to not only do a little pond ice skating but to let nature concentrate my brews through freeze distillation. Freeze distilling is in line with all of the great methods of “natural technology” where you really don’t have do anything. All the work is in making your alcoholic beverage as you usually do and letting nature do the rest.